ProSim Audio 2
Contents
1 Module Description
1.1 General
ProSim Audio module has 2 roles in the setup:
- To manage and play all simulated in-cockpit sounds – like callouts and warnings
- To control the software intercom
1.2 Requirements
- Windows 10 or newer, all critical updates installed
- Latest .NET Framework
- ProSimA322 1.58+ or ProSim738 3.22+
1.3 Installation
To install ProSim Audio 2 just extract the ProSimAudio2.zip in accordance with the Installation instructions section on the Getting Started page.
1.4 Multiple Instances
Unlimited, multiple instances on the same computer or over the network are allowed.
The new architecture of ProSim Audio 2 allows you to configure the entire sound/intercom system using only one ProSim Audio instance. This is also the recommended solution to achieve the lowest intercom latency.
1.5 Initial configuration
If the ProSim Audio 2 module runs on a secondary networked computer, you’ll need to set the Server IP/port within the ProSim Audio 2 module by selecting ProSim Audio -> Preferences -> General from the menu.

After saving, the Server Status in the main ProSim Audio window should show as Connected (if ProSim System is running)

1.6 Additional configuration
In ProSim Audio -> Preferences -> General
| Name | Description | Default |
|---|---|---|
| Start minimized | when enabled, module will start minimized | Disabled |
| Allow shutdown | when enabled, computer will shutdown after Shutdown command from the IOS | Disabled |
| Theme | switching between light/dark color theme | Light |
1.7 Support files
Located in the ProSim Audio 2 folder
| Name | Description |
|---|---|
| config.xml | contains all the configuration made by the user. Should be copied to a backup after the module is fully configured, so it could be used to restore the configuration if needed. Should be always included when contacting support |
| log-Audio2.txt, crashlog.txt | log/crashlog files important for troubleshooting, should be always included when contacting support |
2 Sounds
2.1 Default configuration
When starting ProSim Audio for the first time, all sounds are enabled, with maximum volume, and assigned to the System Default channel group (see the chapter Channel group for an explanation).
2.2 Additional configuration
For each sound, you can adjust the volume
If needed sounds could be disabled individually
<<<add screenshot>>>
2.3 Channel groups
ProSim Audio allows directing individual sounds to a specific playback device(s) and its channel(s).
If you have, for example, multiple speaker systems installed and want to define which sounds are being played from which speaker.
You can also split one stereo output channel into 2 individual mono channels.
When you first start ProSim Audio, no Channel groups are created and all sounds are assigned to System Default Channel group. System Default channel group is the primary output device as set in Windows.
To create a new custom Channel Group, open Preferences -> Audio Output.
- Click on Add new Group

You should change the name to something you’ll be able to recognize later when assigning the sounds (i.e. MIP speakers…)
- Click on Add Device and select the Audio Device from the menu, then select the channel(s).
There is a test function for easier identification of the correct output/channel.

- Add additional device(s) to the Group (if needed)
- Click Save
- Create as many Groups as you need depending on your audio/speaker system.
- When the Groups are created, you can then assign each sound to the desired Channel Group.
In the main ProSim window, find the sounds you want to assign and then select the desired Group from the menu in the Channel Group column
2.4 Add-on sounds
In order to add a new sounds, a few steps to accomplish this must be taken. To be able to better explain this process, a sound is added to ProSim738 as an example, the whole process is explained. This process is exactly the same with ProSim320. The sound that will be added in this example is the sound of the AC power.
2.4.1 Steps in ProSim Systems
There are a few steps that must be taken in ProSim738/320 Systems before a new additional sound can be played by ProSim Audio. Additional sounds can be sourced from the internet such as AVSIM, or from third-party sound packs. Also a lot of sounds are shared through the ProSim-AR forums.
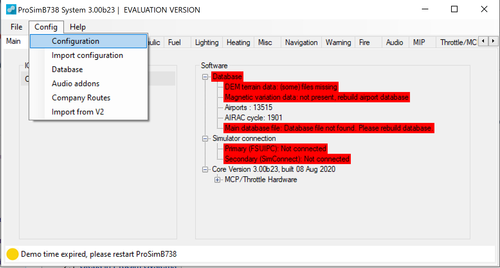
When the file(s) has/have been downloaded, to add to ProSim, save them in an easy-to-access folder, such as a new 'Audio'-folder within the ProSim Audio folder. You should now start ProSim738 Systems to get started. Open the 'Audio Addons'-window by clicking 'Configuration' on the navigation bar, and then 'Audio Addons'.
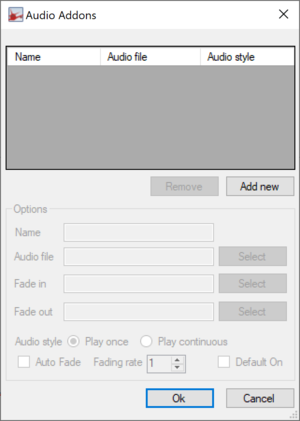
You will then be presented with a window listing all your addon sounds.
To add a new sound, press the 'Add new'-button. A new row will be inserted, and the options below will be opened to fill in:
- Name
- File
- Fade in file
- Fade out file
- Audio style: Play once or play continuous
- Auto fade on or off
- Fading rate
- Default on or off
The settings depend on the type of sound and its purpose. The sounds generated by the packs for example should play continuously, whereas the sound of the seat belt sign should only play once, which is when the switch is flicked. Use the 'Select'-button next to the 'File'-field to browse and select an audio-file to use.
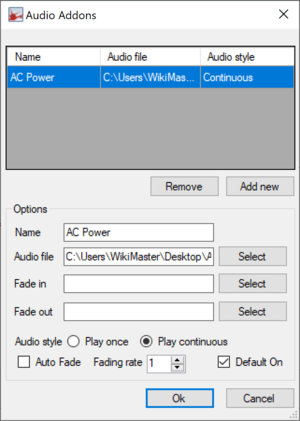
For this example, the following settings where used:
Now that the new audio add-on has been made 'known' to ProSim Systems, instruct the system what the trigger is to play the sound. This is done by so-called gates and ProSim738/320 has a gate for every switch and also for a lot of different situations (whether on the ground or not). An audio add-on can be coupled to a gate using the 'Combined Configuration'-window in [ProSim737 Systems|ProSim738 Systems]. Open the 'Combined Config'-window to by clicking on the 'Config'-button on the menu bar, and then select 'Configuration' in the drop down menu.
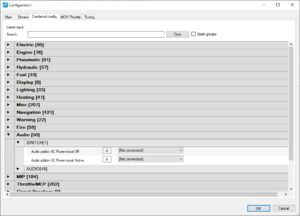
In the window that opens, select and open the 'Combined Config'-tab and then open the 'Audio'-menu by scrolling down and clicking on the black arrow on the left of 'Audio'. The list will unfold into 'Switch' and 'Audio'. Click on 'Switch' to open that menu. A list of all selected add-on sounds will be displayed here. In this example, we see the AC-Power add-on sound listed as the only add-on sound.
We must now tell ProSim Systems that the sound must be triggered by a 'gate'. This is done by opening the dropdown menu that says 'Not connected' and then clicking on 'Gate'.
Now the triggering 'gate' must be selected. Open the dropdown-menu next to 'NAME OF YOUR AUDIO ADD-ON input active'. The full list of gates available is presented. In this example, the AC-Power gate is all the way at the top.
Once completed, click the 'OK' button and restart ProSim Systems and ProSim Audio.
2.4.2 Steps in ProSim Audio
Adjust the volume and assign the newly added sound to the desired Output group as described in the Channel Groups section
3 Intercom
3.1 Default configuration
Intercom is not configured/enabled by default, has to be configured manually
3.2 General guidelines
3.3 Setting up intercom
In order to configure the intercom, you need to define the input and output devices and then assign them to a corresponding intercom role.
3.3.1 Input devices
- In Preferences -> Audio Input click Add new device and change the name so it matches the position/intercom role of the device (i.e. CAPT BOOM).
- Select the input device from the menu and then select the channel (there is a real-time input level meter at each channel for easier identification of the correct input/channel)
- Save.
- Define all the input devices as required by your intercom setup.
3.3.2 Output devices
See the section Channel groups.
Create a Channel Group for each intercom playback device (Headset, Speaker on CAPT/FO/OBS positions)
3.3.3 Intercom configuration
- In Preferences -> Intercom Panels you can see Intercom inputs/outputs for each cockpit position (CAP/FO/...) – select from the menus the corresponding input output devices
- Save
3.3.4 Intercom test
- Test the assigned outputs using the output test (as described in the Channel groups section)
- Test the assigned inputs using the input test (as described in the Input Devices section)
- Full intercom test has to be done on the ProSim System level - you'll need to enable the intercom on the audio control panel (or in ProSim System if the audio control panel (hardware) is not connected))
3.4 Use case - example intercom configuration
We’ll use this as an example of how to configure the intercom.
For this, we’ll use 2x headsets, connected as follows:
- Input devices
- Capt microphone – Headset (Mpow M5 Hands-Free AG Audio)
- F/O microphone – External Mic (Realtek(R) Audio)
- Output devices
- Capt Headset – Headset (Mpow M5 Hands-Free AG Audio)
- F/O Headset – Headphones (Realtek(R) Audio)
See below the screenshots of the configuration of the Audio Input, Audio Output and Intercom Panels for this specific example
4 Use of VHF1 and VHF2 external channels
If flying online on IVAO or Vatsim, audio input/output needs to be redirected to/from ProSim's intercom system.
A simple way to do it, is adding some virtual cables so the external application can connect to the intercom.
As we are talking about ATC communication, this is done with the VHF1 and 2 channels.
For a bi-directional ATC communication system, 2 virtual cables will be needed per channel. In the below examples, we have Cable A (receiver) and Cable B (transmitter)
In ProSimAudio, Add a group for the sound input to the Cable A (radio receiver) ...
And sound output to Cable B (radio transmitter).
Bac to the external panel, select the newly created input and output groups for the VHF1 channel
In IVAO pilot client, configure the sound output to the Cable A and sound input to Cable B.
Note that the OUTPUT of the pilot client should connect to the INPUT in ProSimAudio.
If using vPilot(VATSIM), config follows the same rule.
Unfortunately, Both VHF 1 & 2 are combined in one single output/input, so we cannot have fully independent VHF1/2 systems. In this case, just 2 virtual cables are needed for both channels (just select the same VHF in and out groups for VHF2).
For online flying, normally a PTT(push-to-talk) is also required to be configured (forum has very nice topic about it: https://forum.prosim-ar.com/viewtopic.php?f=12&t=16468).
If VHF2 redirection to other applications, like a company channel, is required, an additional 2 Virtual Cables will be needed for the VHF2 input/output.
P3D ATIS or ActiveSky weather audio can also be redirected to the intercom system.
For P3D, select the audio cable as voice output device.
Follow the same rule for Active Sky weather reports.


